Outline for Giant Reese’s Peanut Butter Cup (Part 1)
Creating a Giant Reese’s Peanut Butter Cup at home is not just a culinary adventure; it’s a delightful experience that fills your kitchen with the heavenly aroma of chocolate and peanut butter. This behemoth treat is perfect for birthdays, special occasions, or just when you want to impress your friends (and let’s be real, treat yourself!). Here’s how to get started with your very own gigantic installment of this beloved candy.
Gathering Your Ingredients
Before diving into the fun part of making your Giant Reese’s Peanut Butter Cup, it’s essential to assemble all your ingredients. Here’s what you’ll need:
- Chocolate Chips: Opt for high-quality semi-sweet or dark chocolate. You can find great options at Ghirardelli or your local grocery store.
- Peanut Butter: Choose creamy or crunchy peanut butter based on your texture preference. Natural peanut butter works wonders too!
- Powdered Sugar: This will help us make a sweet filling without the gritty textures.
- Butter: Unsalted butter is ideal, as it allows you to control the salt levels in your treat.
- Parchment Paper: This will prevent sticking and make for easier cleanup.
Having everything ready will streamline your process and keep you organized. Imagine the satisfaction of checking everything off your list as you go!
Crafting the Chocolate Shell
The first step in creating your Giant Reese’s Peanut Butter Cup is to prepare the chocolate shell. Here’s a quick method to achieve that luscious outer layer:
-
Melt the Chocolate: Start by melting about two cups of your chocolate chips in a microwave-safe bowl. Heat in 30-second intervals, stirring in between, until smooth and fully melted.
-
Create the Base: Pour half of the melted chocolate into a large round cake pan lined with parchment paper. Use a spatula to evenly spread it across the bottom. This is your base layer, so make it nice and even!
-
Chill: Place the pan in the fridge for about 15–20 minutes until the chocolate hardens. This ensures a sturdy shell for your peanut butter filling.
Making the Delectable Peanut Butter Filling
The star of the show, our creamy peanut butter filling! This step is where the magic happens. The balance of sweetness and nuttiness will make your efforts worthwhile. Here’s how to whip it up:
-
Mix Ingredients: In a mixing bowl, combine one cup of peanut butter, three quarters of a cup of powdered sugar, and two tablespoons of softened butter. Blend until smooth and well combined.
-
Adjust Consistency: If the mixture feels too dense, you can add a little more peanut butter to achieve that creamy goodness. Remember, the key is to have a spreadable texture that holds shape but is still luscious.
-
Add Flavor: A pinch of salt can enhance the overall flavor, balancing the sweetness perfectly.
Once the filling is ready, you’re just about set to construct the true masterpiece that is your Giant Reese’s Peanut Butter Cup!
Assembling Your Giant Treat
Now comes the exciting part—putting it all together! Here’s how to assemble your confection:
-
Layer the Filling: Remove your chocolate shell from the fridge. Spoon the peanut butter filling onto the chilled chocolate base, smoothing it out evenly.
-
Top it Off: Pour the remaining melted chocolate over the peanut butter filling. You want to seal in that deliciousness while ensuring an even layer on the top.
-
Final Chill: Place the completed treat back in the fridge for a couple of hours, allowing everything to set and meld together into a chocolate-peanut butter dream.
Once you’ve allowed your Giant Reese’s Peanut Butter Cup to chill and set, you’ll truly be ready for the grand unveiling!
Summary
These initial steps are just the beginning of what will be a fun and gratifying process. When it comes to making your own candy, you’re not only creating a delicious treat but also making great memories in the kitchen. Don’t shy away from experimenting with flavors—how about adding some crushed turkey bacon for a surprising crunch (trust me, it works!) or switching up the chocolate type?
Stay tuned for part two, where we’ll dive into garnishing, serving suggestions, and perhaps a few surprise ideas for what to do with your leftover ingredients. Let’s keep the sweet adventures going! Using simple, fresh ingredients and a bit of love, you’re on your way to mastering the Giant Reese’s Peanut Butter Cup. Happy baking!
Introduction to Giant Reese’s Peanut Butter Cup
Why homemade desserts beat fast food
When it comes to satisfying your sweet tooth, homemade desserts truly shine compared to fast food alternatives. There’s something extra special about creating a treat in your own kitchen, especially when you can control every ingredient that goes into it. By making a Giant Reese’s Peanut Butter Cup at home, you not only avoid the preservatives and artificial flavors often found in store-bought options, but you also get to enjoy fresh, customizable ingredients.
Homemade desserts can be healthier too! A 2021 study highlighted that desserts made from scratch can contain less sugar and more wholesome ingredients, like fresh nuts and pure cocoa. Furthermore, when you whip up a treat yourself, you have the freedom to tailor it to your preferences—whether you want it sweeter, creamier, or packed with even more peanut butter bliss.
The joy of making a giant treat
Who doesn’t love the idea of a Giant Reese’s Peanut Butter Cup? Transforming a beloved candy into a show-stopping dessert is not only fun but incredibly rewarding. Picture this: you take that first slice, revealing layer upon layer of silky chocolate and creamy peanut butter, and watch your friends’ eyes light up with joy. Plus, making a giant version means you can share (or keep it all to yourself, no judgment here!).
Having a giant treat on the table can elevate any occasion, whether it’s a birthday party, a cozy movie night, or just because. The joy of creating and sharing something unique can foster good vibes all around, making memorable moments with the people you care about.
A personal anecdote about love for peanut butter
Let me take you back to my childhood. I remember eagerly waiting for school lunch, mostly because of the peanut butter sandwiches lovingly packed by my mom. Those sandwiches weren’t just food; they represented comfort and nostalgia. My love for peanut butter has only grown since then. I even tried to recreate those sandwiches in dessert form, leading me to the delicious idea of a Giant Reese’s Peanut Butter Cup.
Imagine a world where you can craft a massive version of your favorite childhood treat. That’s why I’m so excited to share this recipe with you! It’s a chance to relive those delightful memories while indulging in the rich, creamy goodness of homemade peanut butter and chocolate. If any of this resonates, you’ll want to stick around; the recipe is not only simple but utterly scrumptious!
For more insights on homemade treats, check out The Benefits of Baking at Home.
Ingredients for Giant Reese’s Peanut Butter Cup
Creating a Giant Reese’s Peanut Butter Cup is an exciting culinary adventure! Let’s break down the essential ingredients you’ll need to whip up this delectable treat.
Essential ingredients for the crust
For the crust, you’ll need:
- Graham cracker crumbs: These form the crunchy base, giving a delightful texture.
- Sugar: A touch of sweetness to balance the flavors.
- Butter: Melted for binding everything together, adding richness to the crust.
This combination sets the perfect stage for all that creamy peanut butter goodness.
Key components for the filling
Next up is the filling, where the real magic happens! Gather:
- Creamy peanut butter: The star ingredient that brings that signature flavor.
- Powdered sugar: This sweetener helps achieve that irresistible, dreamy filling texture.
- Peanut butter chips or chopped peanuts (optional): For added texture and a bonus peanut punch!
This layer will make your Giant Reese’s Peanut Butter Cup a crowd-pleaser.
Final touches for the ganache
To crown your creation, you’ll need:
- Semi-sweet chocolate: For a rich, melty ganache that envelops the filling.
- Heavy cream: It ensures that your ganache has a luscious consistency.
This lovely chocolate layer not only enhances flavor but also makes the dessert visually stunning. Want to dive deeper into chocolate ganache techniques? Check out Serious Eats for some expert tips!
Once you have everything ready, you’re just a few steps away from enjoying your Giant Reese’s Peanut Butter Cup!
Outline for Giant Reese’s Peanut Butter Cup (Part 2)
Creating an impressive Giant Reese’s Peanut Butter Cup is not just about the ingredients; it’s about the experience! In this section, we’ll dive into the steps that transform your ingredients into a dreamy chocolate and peanut butter masterpiece. Let’s break down the process, ensuring that your creation is as flawless as it is delicious.
Gathering Your Ingredients
Before you even think about melting chocolate or mixing peanut butter, let’s make sure you have everything you need. Here’s a quick rundown of the ingredients you’ll require:
- Milk Chocolate Chips: These will form the outer layer.
- Peanut Butter: Creamy or chunky—your choice!
- Powdered Sugar: It adds sweetness and helps create a smooth filling.
- Turkey Bacon or Chicken Ham (for an optional savory twist): This might sound unusual, but adding something savory can balance out the sweetness remarkably.
For a rich texture, you might want to consider how you can elevate the layers. Did you know that combining chocolate with a hint of salt can enhance its flavor? For tips on balancing flavors in desserts, check out this comprehensive guide from King Arthur Baking.
The Melting Process
Melting chocolate sounds simple, but it can be tricky if you’re not careful. Here’s how to do it flawlessly:
-
Double Boiler Method: Use a heatproof bowl set over a pot of simmering water. Make sure the bowl doesn’t touch the water. Stir occasionally until melted.
-
Microwave Option: Place chocolate in a microwave-safe bowl. Heat in 30-second intervals, stirring in between until it’s fully melted.
Tip: Use a silicone spatula for easy stirring. This is a great way to ensure that you’re not overheating your precious chocolate!
When melting chocolate, keep in mind that you want it to be smooth and shiny—this is a key visual indicator of quality chocolate. If it looks dull, it might have seized. For some practical insight, check this article on melting chocolate from Serious Eats.
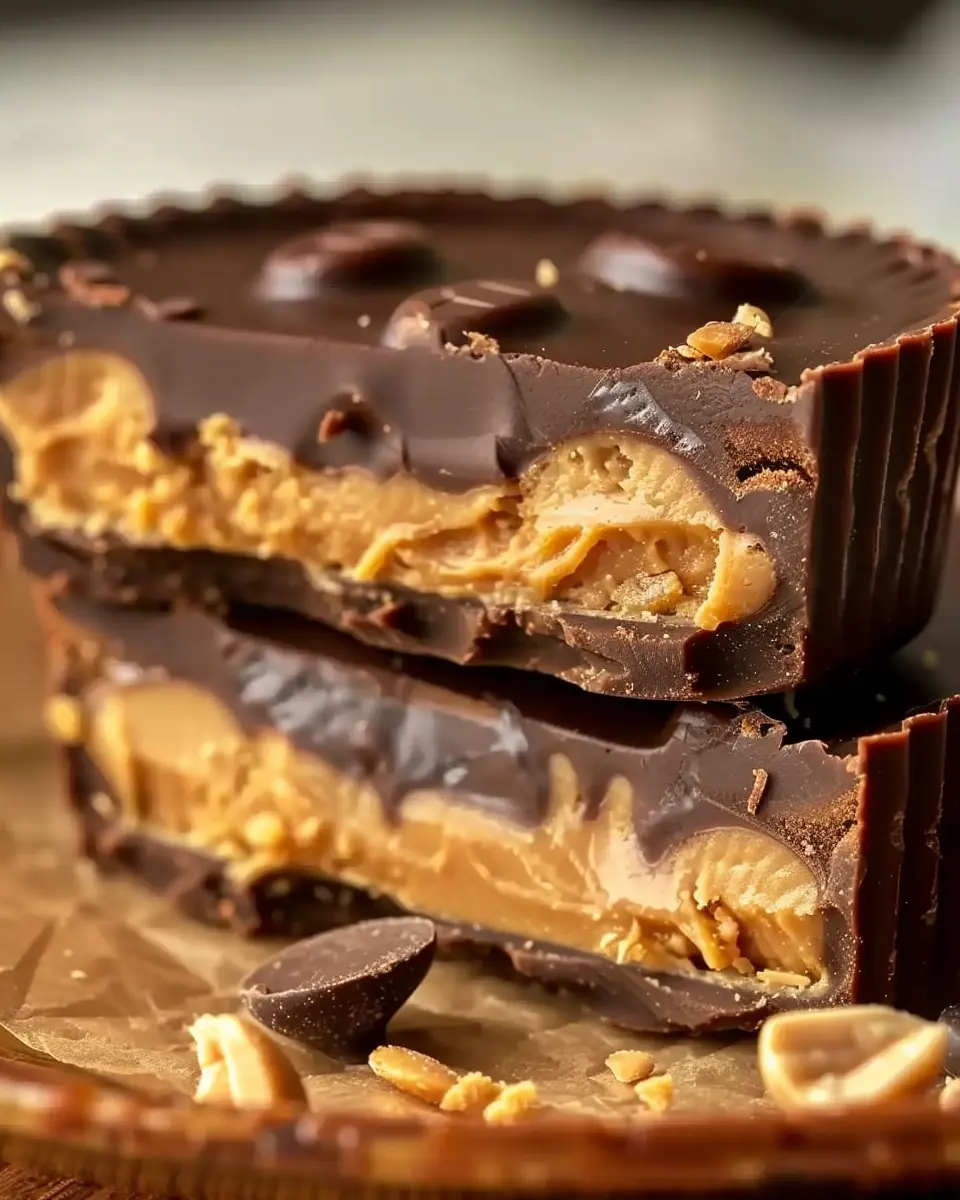
Layering Your Giant Reese’s Peanut Butter Cup
Once your chocolate is ready, it’s time to start building those layers. Here’s how to make your Giant Reese’s Peanut Butter Cup come alive:
-
First Layer: Pour a generous amount of melted chocolate into a cake pan, tilting it to cover the sides.
-
Chill: Let it sit in the refrigerator until firm. This step is crucial as it ensures a solid foundation.
-
Peanut Butter Filling: Mix your peanut butter with powdered sugar until smooth. Spoon it into the chilled chocolate layer, making sure it’s evenly spread.
-
Optional Savory Layer: If you’re feeling adventurous, add a layer of cooked, crumbled turkey bacon or chicken ham for that unexpected but delightful savory punch.
-
Top Layer: Finish by pouring more melted chocolate over the peanut butter layer. Smooth it out, and make sure all filling is sealed under the chocolate.
Setting and Enjoying Your Treat
Now that you’ve masterfully crafted your layers, it’s time to let your creation set properly.
-
Chill Time: Allow your Giant Reese’s Peanut Butter Cup to chill in the refrigerator for at least 2 hours to ensure that it sets completely.
-
Serving Tips: When ready to serve, use a sharp knife to cut it into wedges or squares. It might look almost too good to eat, but trust me—the flavor will make it so worth it!
And don’t forget to share your experience! When was the last time you made a dessert that brought everyone together? Get your friends involved, and make it a night filled with laughter and sweetness.
For additional inspiration, you might want to check out Food Network’s dessert ideas for more fun recipes and tips!
There you have it—your Giant Reese’s Peanut Butter Cup is ready to impress. In the next section, we’ll discuss some variations and ways to customize your creation. Stay tuned for even more delicious ideas!
Step-by-Step Preparation of Giant Reese’s Peanut Butter Cup
Preparing a Giant Reese’s Peanut Butter Cup is an exciting and delicious adventure that not only satisfies your sweet tooth but also makes for a great party treat or a unique gift. Let’s dive into this delightful process together!
Gather Your Ingredients
Before jumping into the steps, let’s ensure you have everything you need:
-
For the Crust:
-
1 ½ cups of graham cracker crumbs
-
½ cup of granulated sugar
-
½ cup of unsweetened cocoa powder
-
½ cup of melted butter
-
For the Peanut Butter Filling:
-
2 cups of creamy peanut butter
-
1 cup of powdered sugar
-
1 teaspoon of vanilla extract
-
1/2 cup of cream cheese (softened)
-
For the Ganache:
-
1 cup of semi-sweet chocolate chips
-
½ cup of heavy cream
With that gathered, let’s get started!
Prepare the Crust Mixture
In a large mixing bowl, combine the graham cracker crumbs, sugar, and cocoa powder. Stir these dry ingredients together until they are evenly mixed. Next, pour in the melted butter and mix until all the crumbs are coated. You’re looking for a texture that clumps together when pressed, similar to wet sand. This is the perfect base for your Giant Reese’s Peanut Butter Cup!
Shape and Chill the Crust
Now, it’s time to shape your crust! Line a 9-inch round cake pan with parchment paper for easy removal, and press the crust mixture firmly into the bottom. The key here is to ensure it’s an even layer—this will help with texture and flavor.
Once it’s shaped, cover the pan with plastic wrap and place it in the refrigerator for about 30 minutes. Chilling helps it firm up, making it easier to shape later.
Create the Peanut Butter Filling
While your crust is chilling, let’s whip up the tasty peanut butter filling! In a large mixing bowl, combine the peanut butter, powdered sugar, vanilla extract, and softened cream cheese. Beat the mixture until it’s smooth and creamy. The rich, velvety texture of this filling is what makes the Giant Reese’s Peanut Butter Cup so decadent and satisfying.
Spread the Filling into the Crust
After the crust has chilled, it’s time for the fun part! Spoon the peanut butter filling over the chilled crust and spread it into an even layer. Take your time to ensure every corner is filled. The combination of textures in this dessert is what makes it truly special.
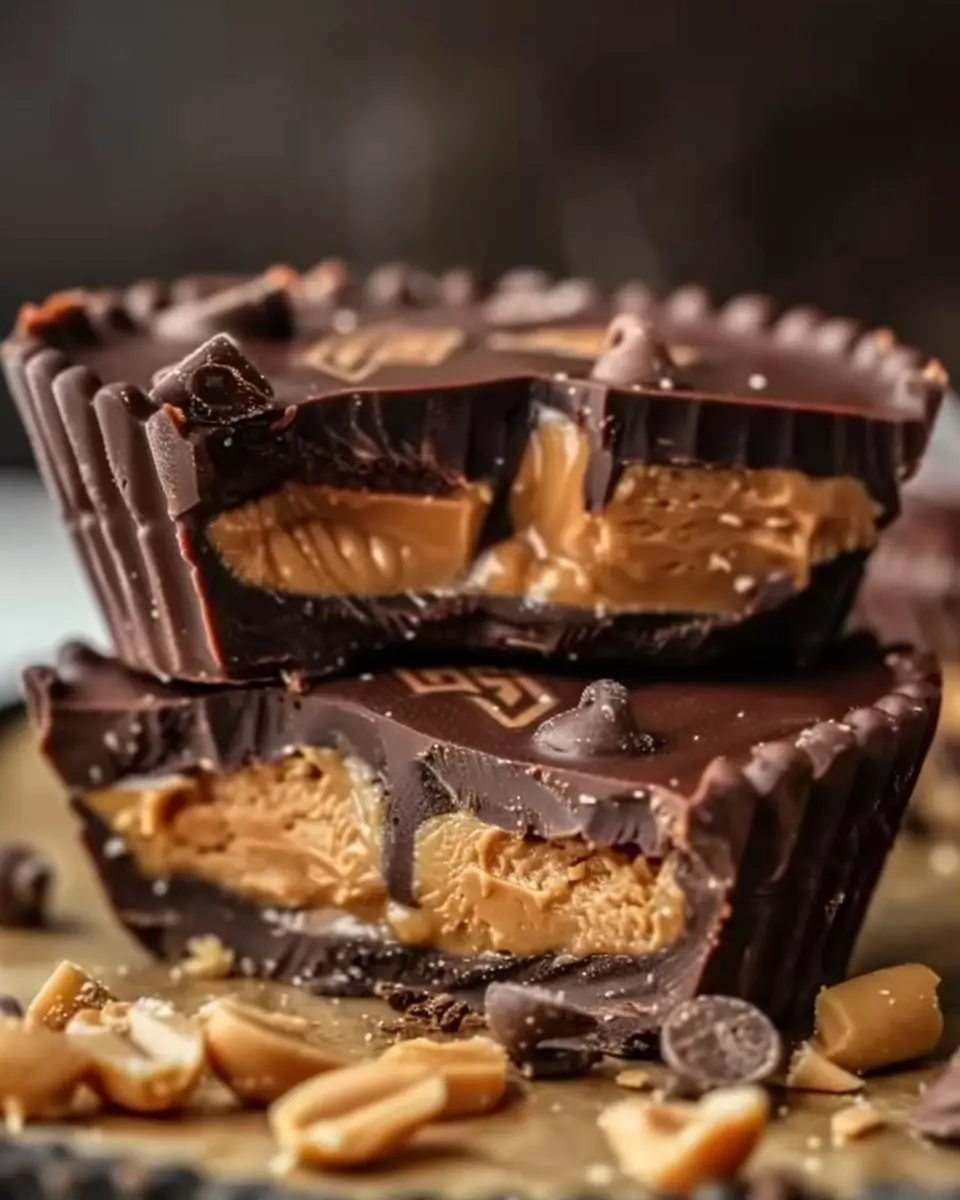
Make and Pour the Ganache
For the final, luscious touch, let’s create the chocolate ganache. Heat the heavy cream in a small saucepan over medium heat until it just starts to simmer, then pour it over the chocolate chips in a separate bowl. Let it sit for a minute before stirring until smooth. This rich ganache will add a delicious chocolate layer!
Once your ganache is ready, carefully pour it over the peanut butter filling, spreading it gently to ensure even coverage.
Chill Until Firm
Now, your Giant Reese’s Peanut Butter Cup is almost complete! It needs some time to set. Cover it loosely with plastic wrap and place it in the refrigerator for at least 2 hours, or until the ganache is firm. This chilling time is crucial; it ensures that your treat holds its shape when you slice into it.
And just like that, with a little bit of patience and a whole lot of deliciousness, you’ll have your very own Giant Reese’s Peanut Butter Cup! Enjoy the admiration of your friends when you serve this showstopper, and don’t forget to share your experience! Explore more sweet recipes and tips for entertaining on Bon Appétit or Serious Eats. Happy baking!
Outline for Giant Reese’s Peanut Butter Cup (Part 3)
After diving into the exciting world of creating a Giant Reese’s Peanut Butter Cup, it’s time to wrap up your culinary adventure with a focus on the final touches and presentation. This section will guide you through completing your masterpiece, ensuring it not only tastes heavenly but looks fantastic too.
Adding a Velvety Finish
Now that you’ve poured your luscious peanut butter and chocolate bliss into a giant mold, it’s time to think about the finish. You want your Giant Reese’s Peanut Butter Cup to have that eye-catching shine.
- Chill Your Giant Delight: After assembling, place your creation in the refrigerator for about 1-2 hours. This will allow the layers to set well.
- Create a Glossy Coat: If you want to elevate the aesthetic, consider a drizzle of melted chocolate on top. For an extra touch, add some crushed peanuts for garnish; they not only add visual appeal but also that delightful crunch!
Presentation is Key
A well-presented dessert is half the enjoyment! Once your Giant Reese’s Peanut Butter Cup has set and cooled, think about how to serve it.
- Dividing It Up: Use a sharp knife for even slices. Remember, presentation matters, so consider placing your slices on a bright, fun plate (check out these plates from a popular home goods store).
- Serving Suggestions: Pair your creation with a glass of cold milk or a scoop of vanilla ice cream. This contrast will enhance the rich flavors of the chocolate and peanut butter, making each bite feel indulgent.
Storing Your Creation
If by chance you find that you have leftovers (doubtful, but hey, life happens), here’s how to store your Giant Reese’s Peanut Butter Cup effectively:
- Wrap it Up: Use plastic wrap or aluminum foil to cover it tightly. This will help maintain its freshness and prevent any odors from your refrigerator from seeping in.
- Refrigerate: Store it in the fridge for up to a week. If you want to keep it longer, consider freezing portions. Just make sure to thaw it properly before indulging again!
The Sweet Reward: Enjoying Your Creation
There’s truly nothing like indulging in something you’ve made from scratch—especially when it resembles a giant chocolate peanut butter masterpiece! Perhaps you’ll want to celebrate your creation with friends or host a little tasting party.
- Invite Friends Over: Share the joy! Have a few friends over for a DIY dessert night where everyone can customize their slice with toppings like seasonal fruit, whipped cream, or even a sprinkle of sea salt. You might even find some inspiration for your next culinary project!
Isn’t it amazing how something so simple, like a Giant Reese’s Peanut Butter Cup, can become a showstopper at any gathering? You’ll quickly become the go-to dessert person in your circle!
Final Thoughts
As you cross the finish line of your Giant Reese’s Peanut Butter Cup journey, remember that the key to great cooking (and baking) is to enjoy the process. Embrace the joy of creating something delicious and share it with those you love. Need some inspiration for other desserts? Check out these incredible dessert ideas that your friends will absolutely rave about!
By following these final steps, your creation will be more than just a dessert; it’ll be a delightful experience that you can share and savor! So, roll up your sleeves, tie on that apron, and make this Giant Reese’s Peanut Butter Cup your new favorite recipe!
Variations on Giant Reese’s Peanut Butter Cup
Creating a Giant Reese’s Peanut Butter Cup at home is a fun culinary adventure, and the variations you can explore will impress your friends and family. Let’s dive into a few exciting ways to customize this beloved treat!
Adding Different Flavors to the Filling
Why stick to the classic peanut butter filling when you can take it up a notch? Consider mixing in:
- Nut Butters: Swap out peanut butter for almond or cashew butter for a unique twist.
- Flavored Extracts: A few drops of vanilla, almond, or coconut can dramatically change the taste.
- Sweeteners: Try using honey or maple syrup for a more complex flavor profile.
Experimentation is key! According to a 2019 study published in the Journal of Food Science, flavor combinations can enhance overall enjoyment, so let your creativity shine.
Incorporating Crunchy Elements
Texture is essential in dessert-making. To give your Giant Reese’s Peanut Butter Cup some delightful crunch, think about adding:
- Chopped Nuts: Peanuts, almonds, or hazelnuts can add an earthy bite.
- Rice Crisps: These simple additions can elevate the crunch factor and create an exciting contrast with the creamy filling.
- Cookie Crumbles: Adding crushed chocolate or graham crackers will introduce a fun texture reminiscent of classic desserts.
Seasonal Twist Ideas
Take advantage of the seasons to inspire new flavors. For instance:
- Fall: Incorporate pumpkin spice into your filling, offering a seasonal treat that pairs perfectly with a cozy cup of hot cocoa.
- Spring: A hint of fresh strawberry puree can lighten the experience and add a burst of spring flavor.
- Summer: Consider adding a layer of chocolate mint for a refreshing twist that’s perfect for hot days.
These seasonal ideas not only enhance your Giant Reese’s Peanut Butter Cup but can also be a great conversation starter at gatherings. Happy creating! Check out this link for more fun recipe ideas!
Outline for Giant Reese’s Peanut Butter Cup (Part 4)
Creating a Giant Reese’s Peanut Butter Cup is not just about following a recipe; it’s about the entire experience that comes along with it. By now, you’ve already created some layers, and it’s time to focus on the crucial steps that will bring your dessert masterpiece to life.
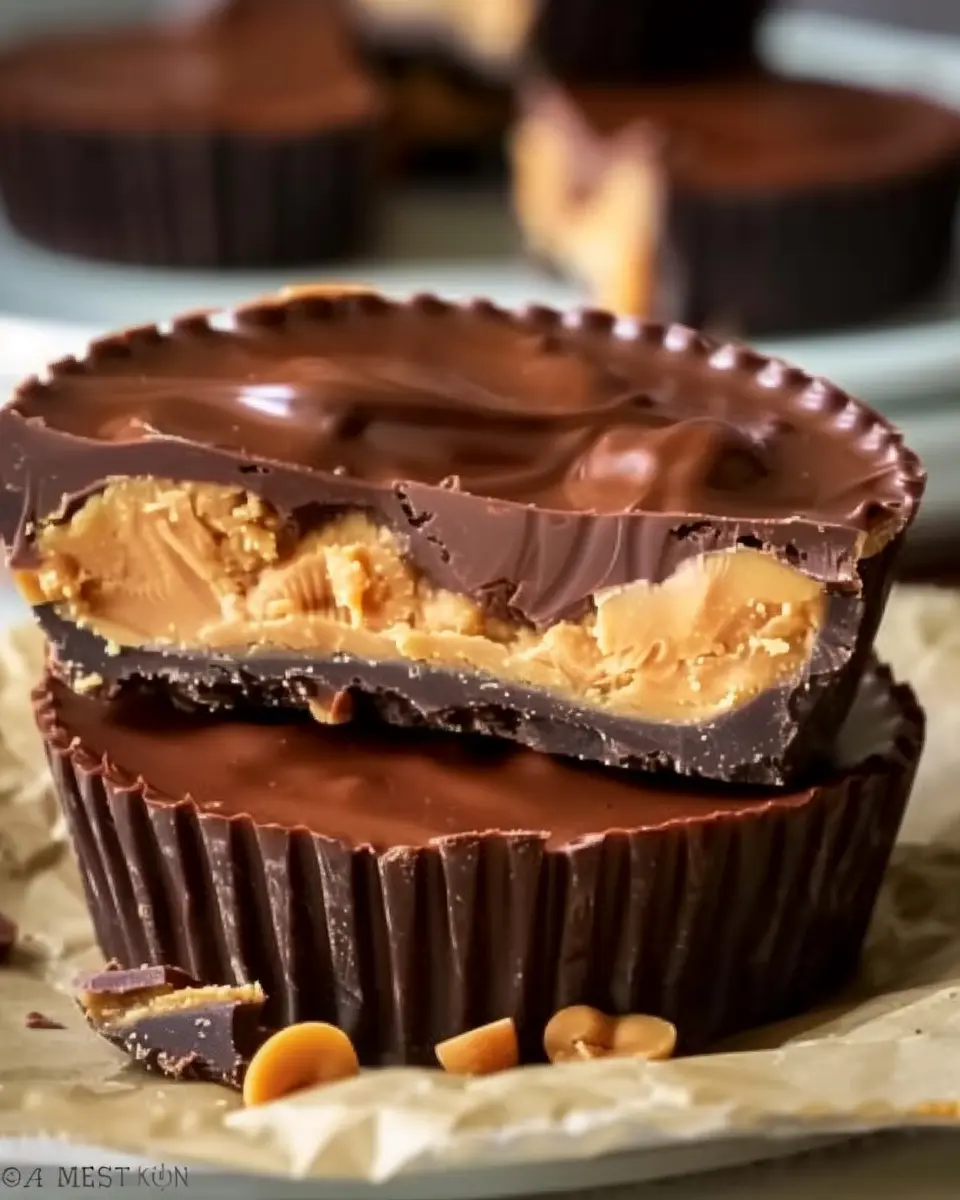
Final Layering: Bringing It All Together
With your layers of rich chocolate and creamy peanut butter ready, it’s time to assemble the final components of your Giant Reese’s Peanut Butter Cup. Here’s a comprehensive look at what you’ll need to complete your creation:
Ingredients:
- Leftover chocolate melts (from previous layers)
- Remaining peanut butter mixture
- Optional: Crushed nuts or cookie crumbs for topping
Steps to Finish:
- Reheat Your Chocolate: If your chocolate has cooled and thickened too much, a quick reheating in the microwave (about 15-20 seconds at a time) should do the trick.
- Layering: Pour a layer of the re-melted chocolate into your prepared pan. Ensure the bottom is fully covered.
- Peanut Butter Layer: Spoon the peanut butter mixture over the chocolate layer. Spread it evenly, smoothing it down with a spatula.
- Top it Off: Pour any remaining melted chocolate over the peanut butter layer, creating a nice seal. This will give you that signature smooth finish.
- Chill: Place the pan in the fridge for about 1-2 hours until it fully sets. Patience is key here—you want to achieve that perfect slice later on!
Tips for a Stunning Presentation
The Giant Reese’s Peanut Butter Cup deserves to have an impressive presentation. Here are a few tips to elevate your dessert game:
- Mix Up Your Colors: Before chilling, sprinkle some colorful dessert décor, like sprinkles or crushed candies, on top. This adds a fun visual element!
- Clean Edges: Use a clean knife to trim any overflow chocolate before slicing. This gives you a gorgeous finish and a professional touch.
- Serve with a Twist: Pair your dessert with a rich homemade whipped cream or a scoop of vanilla ice cream to balance the sweetness.
Making it Your Own
This recipe is versatile. Feel free to customize your Giant Reese’s Peanut Butter Cup with different flavors! Want a hint of spice? Add a sprinkle of cinnamon to your peanut butter mix. Prefer a crunchy texture? Experiment with adding crushed pretzels or a combination of nuts for that extra crunch.
Enjoying the Sweet Rewards
After all the hard work you’ve put in to create this masterpiece, savor the moment when you slice through the rich layers of chocolate and peanut butter. It’s not just a treat; it’s an experience! Have you ever tried making something similar? What toppings did you use? Consider sharing your experiences or variation ideas with friends or on social media to inspire fellow dessert enthusiasts.
You can find more tips on presentation here.
Now that we’re at the end of this process, what’s your go-to method for impressing friends at a gathering? Reflecting on these moments and sharing food can turn any occasion into something special!
Wrapping Up
In conclusion, creating a Giant Reese’s Peanut Butter Cup is a fun project that can be shared with family and friends, or kept all to yourself, who are we kidding? Remember, the best part about baking is to experiment and enjoy the process. So go ahead and take that knife, slice it up, and enjoy your delicious creation! What will you make next?
Baking Notes for Giant Reese’s Peanut Butter Cup
Tips for achieving the perfect crust
Creating the ideal crust for your Giant Reese’s Peanut Butter Cup is all about precision and care. Here are a few tips to help you nail it:
- Chill your dough: After preparing your crust mixture, allow it to chill in the fridge for at least 30 minutes. This helps the fats solidify, leading to a flakier texture.
- Pre-bake for the win: Don’t skip pre-baking your crust! It solidifies the base, preventing it from becoming soggy once you layer on that luscious peanut butter filling.
- Even thickness: Roll out your dough to an even thickness of about 1/4 inch. This ensures uniform baking and avoids any raw spots.
For more crust tips, check out this helpful baking guide.
How to ensure a smooth ganache
A silky ganache is the crown jewel of your Giant Reese’s Peanut Butter Cup. Here are some tricks to achieve that perfect consistency:
- Use quality chocolate: Whether semisweet or dark, high-quality chocolate makes a significant difference in flavor and texture.
- Heat carefully: When melting your chocolate with cream, do it gently—to avoid seizing, opt for a double boiler or microwave in short bursts.
- Stir thoroughly: Once combined, mix until completely smooth. If you notice any lumps, simply give it a brief blitz with an immersion blender.
By following these notes, you’ll create a dreamy dessert that’ll impress everyone around you!
Serving Suggestions for Giant Reese’s Peanut Butter Cup
Garnishing Ideas to Impress Guests
Elevate your Giant Reese’s Peanut Butter Cup with some clever garnishes that will wow your guests. Try adding a sprinkle of crushed salted peanuts for that extra crunch and contrast. Drizzle some chocolate syrup over the top for an artistic presentation and a dose of sweetness. Fresh berries, like raspberries or strawberries, can bring a refreshing tartness that complements the rich peanut butter flavor beautifully. And for a playful touch, consider serving it with a scoop of vanilla ice cream on the side—the creaminess pairs wonderfully with the decadent chocolate and peanut butter.
Pairing with Beverages
When it comes to beverages, think beyond the usual soft drinks. A rich coffee or a refreshing matcha latte can balance the sweetness of your Giant Reese’s Peanut Butter Cup, enhancing the overall experience. For a non-caffeinated option, an herbal tea like chai can add a spicy note that pairs surprisingly well with the dessert. Remember, the goal is to create a harmonious tasting experience that ensures every element shines.
For more pairing ideas, check out resources like The Spruce Eats for creative drink combinations!
Outline for Giant Reese’s Peanut Butter Cup (Part 5)
Creating the ultimate Giant Reese’s Peanut Butter Cup involves not just combining chocolate and peanut butter but also layering flavors and textures to perfection. Here, we’ll explore some finishing touches to elevate your dessert game, ensuring it’s as memorable as your childhood favorite yet bigger and better!
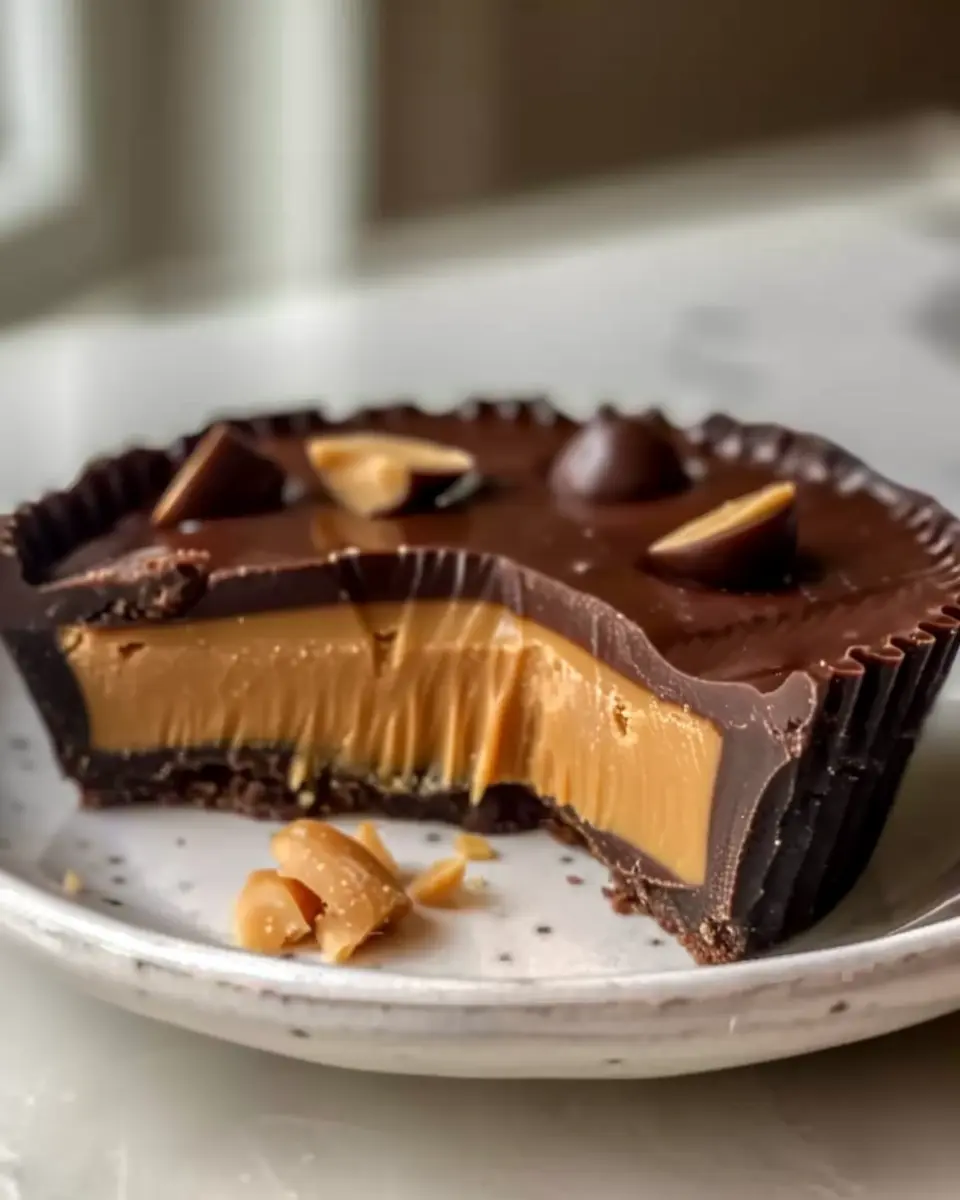
Final Touches: Decorate Your Giant Reese’s Peanut Butter Cup
Once your Giant Reese’s Peanut Butter Cup is assembled and cooled, it’s time to get creative with the decoration. Here are some fun ideas to give your dessert that extra sparkle:
- Chocolate Drizzle: Melt a cup of chocolate and drizzle it artfully over the top. This not only adds visual appeal but also enhances the chocolate richness.
- Crushed Peanuts: Sprinkle some crushed peanuts on top for that delightful crunch that complements the creamy filling.
- Mini Candy Pieces: Consider adding mini chocolate or candy pieces for a playful touch that will please both kids and adults alike.
Serving Suggestions for the Best Experience
To make the most out of your Giant Reese’s Peanut Butter Cup, consider these serving suggestions:
- Slice It Up: Get a sharp knife and cut the giant cup into wedges for easy sharing. Ideal for parties!
- Pair It with Milk: Nothing beats the classic combination of chocolate and milk. Serve it with a cold glass of milk or even a plant-based alternative for a cozy experience.
- Create Dessert Bowls: For a little extra indulgence, serve slices on a bed of whipped cream or vanilla ice cream.
Innovative Pairings to Complement the Flavors
If you’re looking to impress your friends at your next gathering, think outside the box with unique pairings that can elevate your Giant Reese’s Peanut Butter Cup:
- Fruits: Fresh strawberries or banana slices can provide a refreshing contrast to the sweetness.
- Nut Butters: A dollop of almond or cashew butter on the side adds an interesting twist.
- Coffee Drinks: Pairing this dessert with a flavored coffee or a mocha can create a delightful after-dinner treat that will have everyone raving.
Storing the Leftovers (If There Are Any!)
You might be surprised at how quickly a giant sweet can disappear, but if you do find yourself with leftovers, here’s how to keep them fresh:
- Refrigeration: Store your Giant Reese’s Peanut Butter Cup in an airtight container in the fridge. It should last about a week.
- Freezing: If you want to prolong the enjoyment, consider freezing individual slices wrapped in plastic wrap and then placed in a freezer-safe bag. Just remember to thaw them in the fridge before enjoying!
Concluding Thoughts: Enjoy Your Creation
There you have it – a roadmap to creating and enjoying a scrumptious Giant Reese’s Peanut Butter Cup. Whether you’re making this for a special occasion or just because, these tips will surely set your dessert apart. So gather your friends, slice that masterpiece, and enjoy every decadent bite!
If you want even more inspiration or related recipes, check out this guide on similar desserts that can complement your chocolate cravings. It might even spark some new ideas for your next baking adventure. Happy baking!
Time Breakdown for Giant Reese’s Peanut Butter Cup
Preparation time
Creating a Giant Reese’s Peanut Butter Cup is simpler than you might think. You’ll need about 20-30 minutes for preparation. This includes melting chocolate, mixing the peanut butter filling, and assembling your creation. Make sure to have all your ingredients ready for a smooth process!
Chill time
Patience makes perfect, and in this case, you’ll want to chill your masterpiece for about 2 hours. This is essential for allowing the chocolate to set properly and for all those delectable flavors to meld together perfectly. You can use this time to clean up your cooking space or even plan a fun movie night!
Total time
In total, you’re looking at approximately 2 hours and 30 minutes from start to finish before that delicious first bite. Of course, the chill time can extend a little longer if you want to ensure the best possible texture. It’s worth the wait, especially when you get to indulge in a slice of your very own Giant Reese’s Peanut Butter Cup. Remember to check out more tips on preparing your favorite treats at Baking Tips.
With the right balance of sweetness and creaminess, this is sure to be a crowd-pleaser at any gathering. Enjoy the sweet anticipation!
Nutritional Facts for Giant Reese’s Peanut Butter Cup
When indulging in a Giant Reese’s Peanut Butter Cup, it’s good to know what you’re enjoying. Each serving typically contains around 450 calories, making it a rich treat that’s best savored rather than devoured in one go.
Sugar and Fat Breakdown
Let’s talk about sugar and fat content, which are significant in this dessert:
- Sugars: A typical serving has about 38 grams of sugar. This means your sweet tooth is definitely getting satisfied!
- Fats: The cup packs around 27 grams of fat, with some of that being saturated fat. While it’s true that moderation is key, this decadent treat can fit into an occasional splurge.
Understanding these nutritional facts can help you enjoy your Giant Reese’s Peanut Butter Cup guilt-free. For more about managing sugar intake or healthier dessert alternatives, check out resources from the American Heart Association for insights on maintaining a balanced diet while indulging occasionally.
FAQs about Giant Reese’s Peanut Butter Cup
Can I substitute ingredients for dietary preferences?
Absolutely! The beauty of the Giant Reese’s Peanut Butter Cup recipe is its flexibility. If you’re vegan, consider replacing the chocolate with a dark chocolate alternative that suits your dietary needs, and opt for a plant-based peanut butter. Nut allergies? You can use sun butter or a similar product. If you’re looking for a healthier option, try using sugar-free chocolate or swapping out some of the sugar for a natural sweetener like maple syrup. The key is to maintain the ratios in the recipe for the best texture and taste.
How should I store leftovers?
If you miraculously have leftovers of your Giant Reese’s Peanut Butter Cup (though I understand if you don’t!), store it in an airtight container in the refrigerator. This keeps it fresh for up to a week. For longer storage, you can freeze individual slices wrapped in plastic wrap and then in foil. Just let them thaw at room temperature when you’re ready to enjoy them again.
What can I serve this dessert with?
Serving your Giant Reese’s Peanut Butter Cup can be as fun as making it! Consider pairing it with:
- A dollop of whipped cream for added creaminess.
- A scoop of vanilla or chocolate ice cream for a delightful contrast of flavors.
- Fresh fruit like strawberries or bananas for a touch of freshness.
- A drizzle of caramel or chocolate sauce for an extra indulgent treat.
Have you thought about how it might be fun to accompany this dessert with some homemade whipped coconut cream? It’s a fantastic, dairy-free option that adds a luxurious feel. For more serving ideas, you might enjoy checking out this dessert pairing guide.
Conclusion on Giant Reese’s Peanut Butter Cup
Encouragement to try making the dessert
Now that you’re armed with the delightful recipe for a Giant Reese’s Peanut Butter Cup, why not roll up your sleeves and give it a try? This treat is not just a dessert; it’s a conversation starter at any gathering. Plus, there’s something truly rewarding about creating a treat that adds a personal touch to your celebrations.
Final thoughts on indulging in homemade treats
Indulging in homemade treats is about more than just satisfying your sweet tooth; it’s also an opportunity to share love and creativity. Making your own desserts allows you to customize flavors and ingredients, ensuring that every bite is truly special. So, gather your friends or family, share a moment, and enjoy your incredible homemade Giant Reese’s Peanut Butter Cup! For more inspiration, explore sites like Food Network or AllRecipes for similar delicious ideas. Happy baking!
PrintGiant Reese’s Peanut Butter Cup: The Best Indulgent Treat at Home
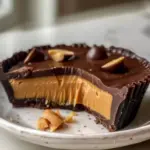
Indulge in the oversized delight of a Giant Reese’s Peanut Butter Cup, an easy and delicious treat you can make at home!
- Prep Time: 15 minutes
- Cook Time: 20 minutes
- Total Time: 2 hours 35 minutes
- Yield: 6 servings 1x
- Category: Dessert
- Method: No-Bake
- Cuisine: American
- Diet: Vegetarian
Ingredients
- 2 cups chocolate chips
- 1 cup creamy peanut butter
- 1 cup powdered sugar
- 1 teaspoon vanilla extract
- 1 tablespoon coconut oil
Instructions
- Melt the chocolate chips with coconut oil in a microwave-safe bowl, stirring every 30 seconds until smooth.
- Pour half of the melted chocolate into a greased large muffin tin to form the base.
- In a separate bowl, mix together peanut butter, powdered sugar, and vanilla extract until combined.
- Spread the peanut butter mixture over the chocolate layer in the muffin tin.
- Pour the remaining melted chocolate over the peanut butter layer, spreading evenly.
- Refrigerate for 1-2 hours or until the chocolate is set.
- Remove from the muffin tin and enjoy your giant treat!
Notes
- For a crunchy texture, add chopped peanuts to the peanut butter mixture.
Nutrition
- Serving Size: 1 slice
- Calories: 520
- Sugar: 36g
- Sodium: 210mg
- Fat: 36g
- Saturated Fat: 16g
- Unsaturated Fat: 16g
- Trans Fat: 0g
- Carbohydrates: 44g
- Fiber: 3g
- Protein: 12g
- Cholesterol: 0mg
Keywords: Giant Reese’s Peanut Butter Cup, dessert, treat, indulgent, homemade